

I noticed that this forum does not yet have a comprehensive oil-change write-up for the Ninja 250, so I decided to add one. Enjoy.
Required tools
Torque wrench
Socket Wrench with 17mm socket
Gloves
Oil Drain Pan
Funnel
Oil Filter (Kawasaki Part # 16099. Non-OEM filter options listed below)
Drain plug washer (Kawasaki Part # 92065)
2 Quarts of Oil (Kawasaki Recommends 10W40)
Container to hold used oil
Optional:
Main O-ring (Kawasaki part # 671)
Mounting bolt O-ring (Kawasaki part # 670)
Non-OEM Oil Filter Options
First off, the oil in your bike needs to be warm. Ride the bike until the engine is fully warmed up.
Kawasaki recommends that the bike be fully perpendicular to the ground when changing the oil. It is easiest to do this by placing the bike on a rear stand. However it is possible, albeit much more difficult, to change the oil on the bikes sidestand.
It is best to have someone hold the bike while placing it onto the rearstand to keep the bike stable. However should no other person be available the bike can be raised by first putting a brick under the sidestand to get it almost level, and then lifting the bike using the stand.
![Image]()
Brick under sidestand
It also doesn’t hurt to use rubberbands to hold the front brake lever for added stability once the bike is raised.
![Image]()
Ninja EX250J on T-Rex Rear Spool Stand
Locate the oil drain plug and the oil filter cover. They can be found underneath the center of the bike. The oil plug is horizontal to the ground and the oil filter cover is the large circular cover with a bolt in the center.
![Image]()
Drain Plug and Oil Filter Cover on EX250J shown from left side of motorcycle
Now would be a good time to put on your gloves. Place the oil drain pan underneath the oil drain plug. Use your socket wrench with a 17mm socket to remove the drain plug. Careful as the oil will be HOT.
![Image]()
EX250J Draining oil from drain plug
Next use the 17mm socket wrench to remove the oil filter cover. Make sure your oil drain pan is underneath the Oil Filter Cover and the Oil Filter Drain Plug. As you begin to loosen the cover, oil will begin to pour out from around the edges of the cover. You may want to wait a few seconds for the oil to stop pouring out of the cover before fully removing it.
![Image]()
EX250J with Drain Plug and Oil Filter Cover Removed
Once the cover is removed loosen the oil filler cap to allow the oil to drain more effectively. Do not fully remove the filler cap, as foreign debris can fall in there.
![Image]()
EX250J Oil Filler Cap as seen from right side of Motorcycle
Let the oil drain for at least 45 minutes. This allows the oil deep in your engine to drain and helps get rid of some of the thicker, sludgier oil which takes longer to drain. This is why you should not get your oil changed at 15 minute oil shops.
While you wait for the oil to drain you can prepare the new filter.
![Image]()
EX250J Filter Element
Begin by removing the Element Fence from the old filter. Next remove the old filter and both O-rings (one seen in the above picture, and the other on the mounting bolt). Many people only change the main O-ring every third oil change or so, and the smaller O-ring even more rarely. The frequency of changing the O-rings is up to you.
A screwdriver helps to get the o-rings off. Rub some of the old, drained oil on your gloved fingers, and apply it thoroughly to the new O-rings before installing them in their respective place.
Once the O-rings are in place begin reassembling the filter assembly with the new oil filter. Pay special attention to the small metal washer under the oil filter. It often sticks to the old filter, so make sure you find it and reinstall it as well instead of accidentally throwing it out with the old filter.
Replace the entire filter assembly. Using the torque wrench, tighten it to 14.5 ft. lbs.
Replace the oil drain plug, making sure to replace the drain plug washer with a new one. Using the torque wrench, tighten the plug to 14.5 ft. lbs.
Lower the bike off the lift and get it on as flat a surface as possible with both wheels being level with each other. Have someone hold the bike upright or if no one is present to hold the bike, put a brick under the sidestand to get it as upright as possible.
Remove the oil filler cap and put a funnel inside. Fill the bike with oil. The bike will need 1.7 US qt with a filter change and only 1.4 US qt if you did not choose to change the filter. Keep an eye on the sightglass as you fill the engine with oil. The sightglass is located near your rear-brake lever.
![Image]()
Ex250J Sightglass
Fill the oil to the max line while still keeping the bike completely level. Wait a couple of minutes to let the oil drain into the engine. Check for any leaks and then check the oil level again. Add oil if necessary. Do not overfill the oil! This can cause a gasket to blow.
Start the bike and run for 15 seconds to let the oil be pumped into the rest of the engine. Turn off the bike and re-check the oil level. Add oil if necessary and check for leaks again. Repeat these steps until the oil level stays within spec. Finally, take the bike on a quick ride around the block and check the oil level one last time.
Drain the oil from the oil drain pan into a large container. Old laundry detergent bottles work great for this. Please dispose of the oil properly at your local oil recycling facility.
Oil Screen
Although no mention of this is found in the Owners Manual, most riders recommend that about once in about every 3 oil changes you should clean your oil screen. I have not yet done this so I will not cover it in this write-up at this time.
Kawasaki Ninja 250R/EX250J Oil Change Procedures
Written By: Dr Shorty
Please note that these procedures are only an opinion on how to change the oil in your motorcycle. These procedures have not been validated by Kawasaki in any way. The author takes no responsibility to any damage occurred to yourself or your motorcycle from correctly or incorrectly following these procedures. Proceed at your own risk.
Required tools
Torque wrench
Socket Wrench with 17mm socket
Gloves
Oil Drain Pan
Funnel
Oil Filter (Kawasaki Part # 16099. Non-OEM filter options listed below)
Drain plug washer (Kawasaki Part # 92065)
2 Quarts of Oil (Kawasaki Recommends 10W40)
Container to hold used oil
Optional:
Main O-ring (Kawasaki part # 671)
Mounting bolt O-ring (Kawasaki part # 670)
Non-OEM Oil Filter Options
- Amsoil: SMF 101 (No longer available. Replaced by WIX 24941.)
- CarQuest: CFI-89941
- Emgo: 10-37500 (includes O-rings) 10-20300 (doesn't have O-rings)
- Fram: CH6012
- Hastings: LF571
- Honda: 15410-426-010 or 15410-300-024
- Kawasaki: 16099-003
- K&N: KN-401
- NAPA: PS4941 (formerly 4941)
- Perf-Form: OF-0047 (formerly J-501)
- Purolator: ML16812
- STP: SMO-12 (Once readily available, now appears to have been discontinued.)
- Triumph: 1210031
- Vesrah: SF-4004
- WIX: 24941
- Yamaha: 36Y-13441-00
First off, the oil in your bike needs to be warm. Ride the bike until the engine is fully warmed up.
Kawasaki recommends that the bike be fully perpendicular to the ground when changing the oil. It is easiest to do this by placing the bike on a rear stand. However it is possible, albeit much more difficult, to change the oil on the bikes sidestand.
It is best to have someone hold the bike while placing it onto the rearstand to keep the bike stable. However should no other person be available the bike can be raised by first putting a brick under the sidestand to get it almost level, and then lifting the bike using the stand.

Brick under sidestand
It also doesn’t hurt to use rubberbands to hold the front brake lever for added stability once the bike is raised.

Ninja EX250J on T-Rex Rear Spool Stand
Locate the oil drain plug and the oil filter cover. They can be found underneath the center of the bike. The oil plug is horizontal to the ground and the oil filter cover is the large circular cover with a bolt in the center.
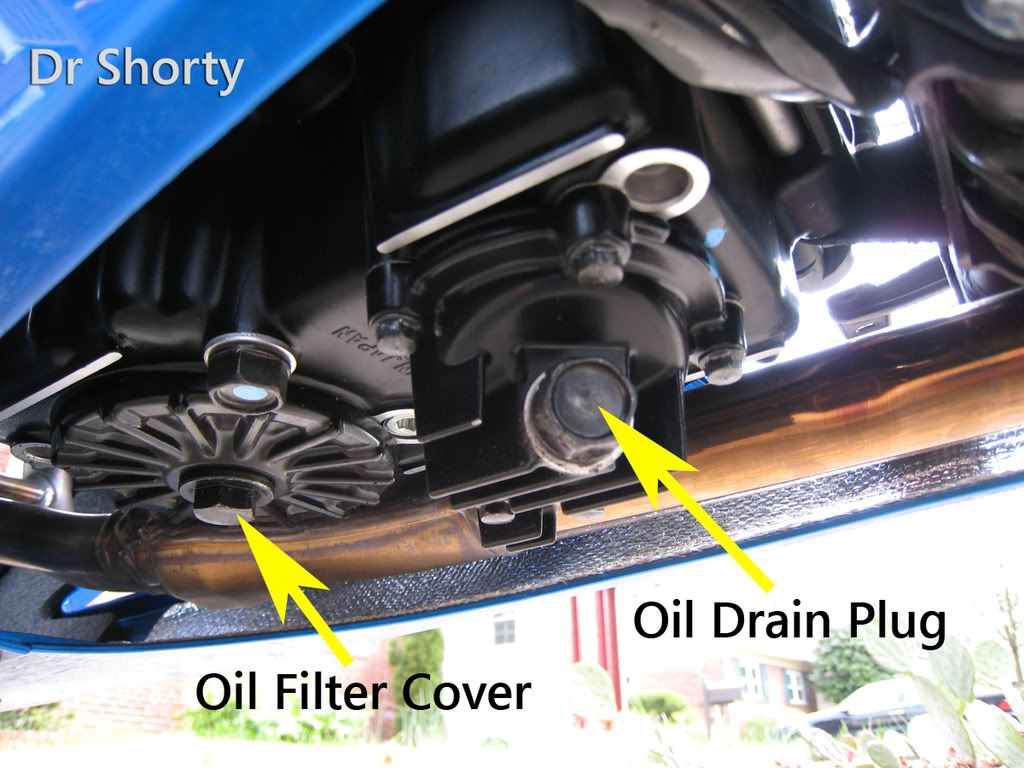
Drain Plug and Oil Filter Cover on EX250J shown from left side of motorcycle
Now would be a good time to put on your gloves. Place the oil drain pan underneath the oil drain plug. Use your socket wrench with a 17mm socket to remove the drain plug. Careful as the oil will be HOT.

EX250J Draining oil from drain plug
Next use the 17mm socket wrench to remove the oil filter cover. Make sure your oil drain pan is underneath the Oil Filter Cover and the Oil Filter Drain Plug. As you begin to loosen the cover, oil will begin to pour out from around the edges of the cover. You may want to wait a few seconds for the oil to stop pouring out of the cover before fully removing it.

EX250J with Drain Plug and Oil Filter Cover Removed
Once the cover is removed loosen the oil filler cap to allow the oil to drain more effectively. Do not fully remove the filler cap, as foreign debris can fall in there.
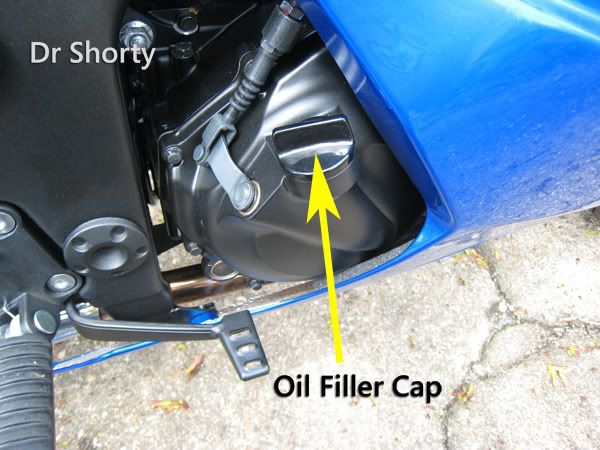
EX250J Oil Filler Cap as seen from right side of Motorcycle
Let the oil drain for at least 45 minutes. This allows the oil deep in your engine to drain and helps get rid of some of the thicker, sludgier oil which takes longer to drain. This is why you should not get your oil changed at 15 minute oil shops.
While you wait for the oil to drain you can prepare the new filter.

EX250J Filter Element
Begin by removing the Element Fence from the old filter. Next remove the old filter and both O-rings (one seen in the above picture, and the other on the mounting bolt). Many people only change the main O-ring every third oil change or so, and the smaller O-ring even more rarely. The frequency of changing the O-rings is up to you.
A screwdriver helps to get the o-rings off. Rub some of the old, drained oil on your gloved fingers, and apply it thoroughly to the new O-rings before installing them in their respective place.
Once the O-rings are in place begin reassembling the filter assembly with the new oil filter. Pay special attention to the small metal washer under the oil filter. It often sticks to the old filter, so make sure you find it and reinstall it as well instead of accidentally throwing it out with the old filter.
Replace the entire filter assembly. Using the torque wrench, tighten it to 14.5 ft. lbs.
Replace the oil drain plug, making sure to replace the drain plug washer with a new one. Using the torque wrench, tighten the plug to 14.5 ft. lbs.
Lower the bike off the lift and get it on as flat a surface as possible with both wheels being level with each other. Have someone hold the bike upright or if no one is present to hold the bike, put a brick under the sidestand to get it as upright as possible.
Remove the oil filler cap and put a funnel inside. Fill the bike with oil. The bike will need 1.7 US qt with a filter change and only 1.4 US qt if you did not choose to change the filter. Keep an eye on the sightglass as you fill the engine with oil. The sightglass is located near your rear-brake lever.

Ex250J Sightglass
Fill the oil to the max line while still keeping the bike completely level. Wait a couple of minutes to let the oil drain into the engine. Check for any leaks and then check the oil level again. Add oil if necessary. Do not overfill the oil! This can cause a gasket to blow.
Start the bike and run for 15 seconds to let the oil be pumped into the rest of the engine. Turn off the bike and re-check the oil level. Add oil if necessary and check for leaks again. Repeat these steps until the oil level stays within spec. Finally, take the bike on a quick ride around the block and check the oil level one last time.
Drain the oil from the oil drain pan into a large container. Old laundry detergent bottles work great for this. Please dispose of the oil properly at your local oil recycling facility.
Oil Screen
Although no mention of this is found in the Owners Manual, most riders recommend that about once in about every 3 oil changes you should clean your oil screen. I have not yet done this so I will not cover it in this write-up at this time.
 , that means a lot. Thank you. I think this is about the only write-up that you haven't covered yet.

